NestJS Basic Concepts (V11.X)
Main Building Blocks
- Controller - Handle incoming request
- Services - Handle business logic
- Modules - Group together everything
- Pipes - Validate incoming data
- Filters - Handle incoming errors
- Guards - Handle authentication
- Interceptors - Adding extra data to incoming request or to response
- Repositories - Handle data stored in DB
Nest does not handle HTTP request itself. We need to provide either Express or Fastify for handling HTTP requests. By default, Nest uses Express,
Nest main libraries,
"@nestjs/common": Functions, Classes which are mainly use in Nest
"@nestjs/core":
"@nestjs/platform-express": Express adaptor to handle HTTP requests
"reflect-metadata": To use of JavaScript Decorator feature
"typescript": TypeScript
tsconfig,
both decorator lines are important to make nest working properly,
{
"compilerOptions": {
"module": "CommonJS",
"target": "ES2017",
"experimentalDecorators": true,
"emitDecoratorMetadata": true
}
}
The architecture of Nest
How to handle request/response with Nest main building blocks
How to generate Nest project using Nest CLI?
First, need to install Nest CLI on computer,
npm install -g @nestjs/cli
Then, create a new project using nest new <project_name>
This will generate the boilerplate for the project
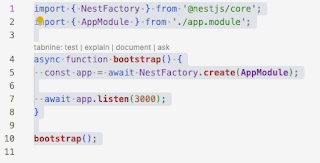
The entry point of the application is main.ts file. It is calling main AppModule,
3 files attached with the main.ts,
- app.module.ts - The entry point
- app.controller.ts
- app.service.ts
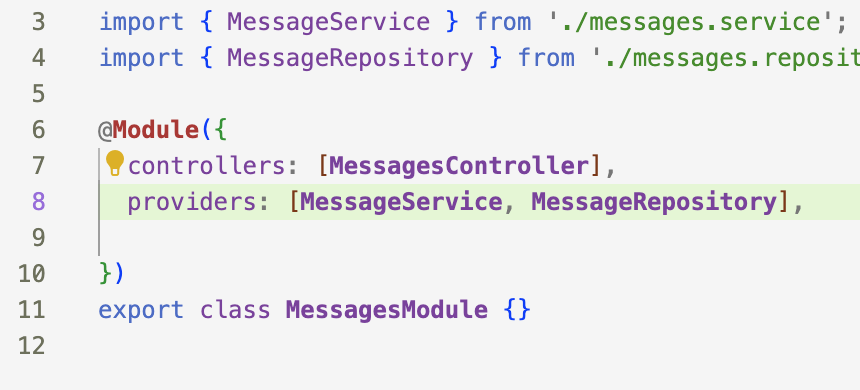
Rest of the modules should be included to the AppModule as bellow,
How to create a new module?
nest generate module <module_name>
How to create a new controller?
nest generate controller <controller_name>
How to create a new service?
nest generate service <service_name>
How to create a whole set of file for a module?
nest generate resource <resource_name>
How to create a app for microservice
nest generate app <resource_name>
Generate above features without test file
nest generate service <service_name> --no-spec
Decorators which we can use for read http request
When we need to create instance of another class within the class, better to use Injectable decorator. In Nest, this will automatically create the necessary instance of object in a singleton manner.
Injectable decorator (within the same module)
When use @Injectable deco, this instance of class will be register inside DI (Dependency Injection) container which can be use in anywhere.
We can use injected class by adding it as provider in module wherever needed, all injectables are call providers,
How to call service from controller
Share services in between different modules
Assume that we have two modules POWER and CPU. We want to use powerService inside the cpuService. Steps are bellow,
1. Export powerService in the powerModule
2. Import powerModule inside the cpuModule,
3. In the cpuService, add a powerService as a constructor parameter,
Now, can access powerService functions inside the cpuService
From controller access service in another module
Let's assume that, we need to access cpuService from computerController (Cpu and Computer are two different modules). Steps are bellow,
1. Export cpuService from cpuModule (cpuService will push into DI container)
2. Import cpuModule from computerModule
3. In the computerController, add cpuService to the constructor,
Now, can access any service in cpuService within the computerController
How HTTP request works in Nest?
How request validation works?
In nest validation work as pipeline. We need to initiate connection from main.ts file,
import { NestFactory } from '@nestjs/core';
import { ValidationPipe } from '@nestjs/common';
import { AppModule } from './app.module';
async function bootstrap() {
const app = await NestFactory.create(AppModule);
// adding validation pipeline. This will intelligently apply when there is
// validation DTO attached to the service
app.useGlobalPipes(
new ValidationPipe({
// remove non existing attributes from the request compare with
// DTO before pass to service
whitelist: true,
}),
);
await app.listen(3000);
}
Then usually, create a DTO file which define module level inside dtos folder. Example, create-user.dto.ts file,
import { IsEmail, IsString } from 'class-validator';
export class CrateUserDto {
@IsEmail()
email: string;
@IsString()
password: string;
}
Then, from the controller, we can attache DTO as a function parameter. It will validate the request against the dto before request goes to the service,
import { Controller, Post, Get, Delete, Patch, Param, Query, Body, NotFoundException } from '@nestjs/common';
import { CrateUserDto } from './dtos/create-user.dto';
import { UpdateUserDto } from './dtos/update-user.dto';
import { UsersService } from './users.service';
@Controller('auth')
export class UsersController {
constructor(private userService: UsersService) {}
@Post('/signup')
createUser(@Body() body: CrateUserDto) {
return this.userService.create(body.email, body.password);
}
}
Interceptors
Use to modify request object or response object on the fly
Create a custom interceptor file. Example interceptor to add the logged in current user to the request object. Create a file call current-user.interceptor.ts,
import {
NestInterceptor,
ExecutionContext,
CallHandler,
Injectable,
} from '@nestjs/common';
import { UsersService } from '../users.service';
@Injectable()
export class CurrentUserInterceptor implements NestInterceptor {
constructor(private usersService: UsersService) {}
async intercept (context: ExecutionContext, handler: CallHandler) {
const request = context.switchToHttp().getRequest();
// in this case, cookie session bind into the request before
// come to this place.
const { userId } = request.session || {};
if (userId) {
// User service can access via interceptor becz injectable
// works with interceptors
const user = await this.usersService.findOne(userId);
request.currentUser = user;
}
// invoke default handle
return handler.handle();
}
}
Interceptors can be call from Controller in individual function or for a entire controller as a decorator,
import {
Controller,
Get,
NotFoundException,
Session,
UseInterceptors,
} from '@nestjs/common';
import { UsersService } from './users.service';
import { CurrentUser } from './decorators/current-user.decorator';
import { CurrentUserInterceptor } from './interceptors/current-usr.interceptor';
import { CurrentUser } from './decorators/current-user.decorator';
import { User } from './user.entity';
@Controller('auth')
@UseInterceptors(CurrentUserInterceptor)
export class UsersController {
constructor(
private userService: UsersService,
private authService: AuthService,
) {}
@Get('/whoami')
whoAmI(@CurrentUser() user: User) {
return user;
}
}
Attached userinfo from interceptor can be access from controller via decorator, current-user.decorator.ts
import {
createParamDecorator,
ExecutionContext
} from '@nestjs/common';
export const CurrentUser = createParamDecorator(
(data: never, context: ExecutionContext) => {
const request = context.switchToHttp().getRequest();
return request.currentUser;
}
);
data - Whatever pass from decorator call as a parameter. Eg. @CurrentUser('SomeData')
Interceptors can apply globally without calling in each controller. Can apply in module level. Eg. users.module.ts. Add dependency into the providers section
import { Module } from '@nestjs/common';
import { TypeOrmModule } from '@nestjs/typeorm';
import { APP_INTERCEPTOR } from '@nestjs/core';
import { UsersController } from './users.controller';
import { UsersService } from './users.service';
import { AuthService } from './auth.service';
import { User } from './user.entity';
import { CurrentUserInterceptor } from './interceptors/current-usr.interceptor';
@Module({
imports: [TypeOrmModule.forFeature([User])],
controllers: [UsersController],
providers: [
UsersService,
AuthService,
{
provide: APP_INTERCEPTOR,
useClass: CurrentUserInterceptor
}
]
})
export class UsersModule {}
Authorization using Guards
Guards can be apply for Module level, Controller level or Handler level. Guard going to be another class in Nest. Eg. auth.guard.ts,
import {
ExecutionContext,
CanActivate,
} from '@nestjs/common';
import { Observable } from 'rxjs';
export class AuthGuard implements CanActivate {
canActivate(context: ExecutionContext): boolean | Promise<boolean> | Observable<boolean> {
const request = context.switchToHttp().getRequest();
return request.session.userId;
}
}
Guard look for the return of true/false from this canActivate mandatory function. If this return true only request goes to the Handler. Otherwise, throw Forbidden resource error.
Call AuthGuard from Handler level,
import {
Controller,
Get,
UseGuards,
} from '@nestjs/common';
import { UsersService } from './users.service';
import { AuthService } from './auth.service';
import { UserDto } from './dtos/user.dto';
import { Serialize } from '../interceptors/serialize.interceptor';
import { CurrentUser } from './decorators/current-user.decorator';
// import { CurrentUserInterceptor } from './interceptors/current-usr.interceptor';
import { User } from './user.entity';
import { AuthGuard } from '../guards/auth.guard';
@Controller('auth')
@Serialize(UserDto)
// @UseInterceptors(CurrentUserInterceptor)
export class UsersController {
constructor(
private userService: UsersService,
private authService: AuthService,
) {}
@Get('/whoami')
@UseGuards(AuthGuard)
whoAmI(@CurrentUser() user: User) {
return user;
}
}
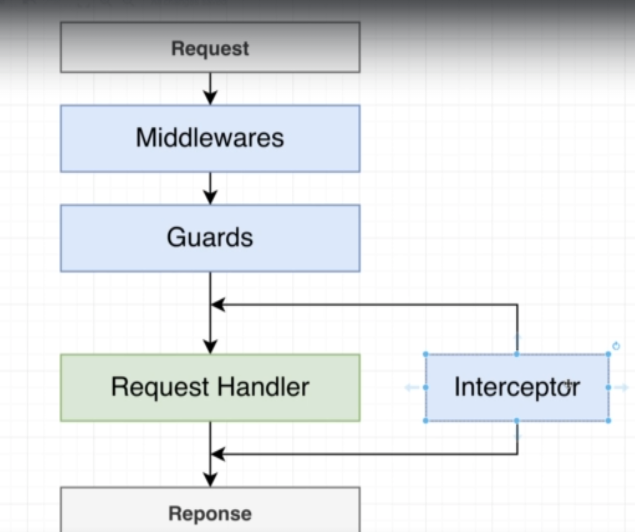
Order of component execution
Note that interceptors are executed after the Middlewares and Guards
Database structure changes
Using TypeORM, there is a configuration synchronize = true to do this automatically by comparing the Entity class properties with the table properties. But, use this flag on production would be a problematic. This flag would lead delete production data automatically. The better solution is having a Migration approach,
In order to run TypeOrm migrations, we need to install TypeOrm CLI. There are 3 steps,
1. npm install ts-node --save-dev (Nest already has this)
2. Add script section in package.json
"scripts": {
    ...
    "typeorm": "NODE_ENV=development node --require ts-node/register ./node_modules/typeorm/cli.js"
}npm run typeorm migration:run -- -d path-to-datasource-configNow, need to modify ormconfig.js file to pass migration params,
const config = {
synchronize: false,
migrations: ['migrations/*js'],
cli: {
migrationsDir: 'migration'
}
}
Cors
Cors can be enabled in main.ts file,
// cors
app.enableCors({
origin: [
'http://localhost:3000',
'http://example.com',
'http://www.example.com',
'http://app.example.com',
'https://example.com',
'https://www.example.com',
'https://app.example.com',
],
methods: ['GET', 'HEAD', 'PUT', 'PATCH', 'POST', 'DELETE'],
credentials: true,
});
Add Prisma
Install Prisma as a dev dependancy and initialze Prisma
npm install -D prisma

npx primsa init
init will create prisma folder and .env file in the project root. Use the schema.prisma file inside Prisma folder for data base information. schema.prisma,
generator client {
provider = "prisma-client-js"
}
datasource db {
provider = "postgresql"
url = env("DATABASE_URL")
}
Prisma migrations
Prisma has two types of migrations
1. Migrations - Create database schema on prisma -> schema.prisma file then push
2. Introspection - Create database first then pull the schema to prisma
Migrations: change the schema.prisma file to add the table structure,
model Role {
id Int @id @default(autoincrement())
name String
created_at DateTime @default(now())
User User[]
}
model User {
id Int @id @default(autoincrement())
name String
email String @unique
password String
role_id Int
created_at DateTime @default(now())
Role Role @relation(fields: [role_id], references: [id])
}
Now, can generate migration file, using following command,
npx prisma migrate dev --name <description_of_change>This will create new migration file inside prisma folder. If we want just create a migration without run it
npx prisma migrate dev --name <description_of_change> --create-onlyIn this way, we can review the migration file before execute it. How we execute it later,
npx prisma migrate devFor production,
npx prisma migrate deployIntrospection: run the following command to pull the table structure,
npx prisma db pullThis will pull existing database structure and update schema.prisma file automatically.
Now, the migration configs are done. Time to create the prisma connection for app using prisma client,
Install Prisma client,
npm install @prisma/clientView data using Prisma Studio
npx prisma studio

npx prisma generate
Prisma generate automatically happens first time. But, there is any changes on the schema, then need to run it manually.
Now, is time to generate prisma service,
nest generate service prisma
nest generate service prismaUpdate prisma.service.ts file inside src/prisma,
import { Injectable, OnModuleInit } from '@nestjs/common';
import { PrismaClient } from '@prisma/client';
@Injectable()
export class PrismaService extends PrismaClient implements OnModuleInit {
async onModuleInit() {
await this.$connect();
}
}
Now, can access prismaService from any other service. Keep in mind following 2 points
- The relevant module should include prismaService as provider
import { Module } from '@nestjs/common';
import { UserService } from './user.service';
import { PrismaService } from '../prisma/prisma.service';
import { UserController } from './user.controller';
@Module({
controllers: [UserController],
providers: [UserService, PrismaService],
})
export class UserModule {}
- Inject prisma service to the service wherever you want to access via constructor
@Injectable()
export class UserService {
constructor(private prismaService: PrismaService) {}
Adding JWT
Install following dependencies,
npm i @nestjs/jwt @nestjs/config
JWT secrete can store in .env file. While we can use Nest config module to manage those secrets efficiently.
Generate secret:,
openssl rand -base64 32
Add generate secrete to the .env file
We can mange environment variables in Nest way by generate config module,
TBD
Now, need to register Jwt module in the module level,
import { JwtModule } from '@nestjs/jwt';
@Module({
imports: [
// without using nest config
JwtModule.register({
secret: process.env.JWT_SECRET,
signOptions: { expiresIn: process.env.JWT_EXPIRATION },
}),
],
providers: [AuthService, PrismaService, UserService],
controllers: [AuthController]
})
export class AuthModule {}
Generate access token using JWT
import { JwtService } from '@nestjs/jwt';
export class AuthService {
constructor(
private jwtService: JwtService,
) {}
async generateTokens(user): Promise<TokenResponse>{
const payload: JwtPayload = {
sub: user.id,
email: user.email,
role: user.role_id,
};
const [accessToken] = await Promise.all([
this.jwtService.signAsync(payload),
]);
}
}
Nest config for .env
In this method, .env file changes will take effect without restart whole process?
npm i @nestjs/config
Add module to the app module, We can validate all needed variables in .env file exists at the same time,
import { validate } from './config/env.validation';
@Module({
imports: [
// attach nest config module
ConfigModule.forRoot({
isGlobal: true,
validate, // validate .env configuration against the config/env.validation.ts file
}),
AuthModule,
],
controllers: [AppController],
providers: [AppService, PrismaService],
})
export class AppModule {}
Create src/config/env.validation.ts and put all the env variables as a class validator
Testing application
TBD
Deploy application
TBD
Special considerations
- Only Services, Repositories and Interceptors can access the DI container. Decorators can not access the DI directly.
(*Special thanks to Stephen Grider)


Comments
Post a Comment